


Reading time: 2 minutes
Replace ROG Ally Speakers with Official Parts
This guide from Asus Accessories will help you quickly restore sound to your ROG Ally or Ally X. The two built-in speakers on this Asus gaming device feature Smart Amplifier technology which uses algorithms and real-time data to improve audio quality. However, like any piece of tech, your ROG Ally or Ally X can suffer damage from everyday wear and tear. If you've noticed a decline in audio quality or if your speakers are damaged, replacing them can renew your device's performance.
Select New ROG Ally Speakers
When it comes to replacing components for your ROG Ally, the allure of generic or third-party parts can be strong. These options often come at a lower price point, making them seem like a fine choice. However, there are several reasons why it's advisable to opt for OEM Asus speakers from a trusted source like Asus Accessories. We only sell Asus-manufactured parts, specifically for your ROG Ally. Original parts will be engineered to fit precisely into the device and integrate with the existing hardware and software. This ensures optimal performance and compatibility without any issues. Furthermore, generic speakers could lead to poor performance, connectivity issues, and even damage to the device.
Step by Step Sound System Replacement
Tools Required: Before you begin, ensure you have the following tools which are also available in a kit on our site:
- Phillips head screwdriver: A small, precision screwdriver is essential for removing screws.
- Plastic pry tool: This will help you carefully separate the device's components without causing damage.
- New speaker replacement: Purchase genuine Asus speakers to ensure compatibility.
1. Power Off and Disconnect: Turn off your ROG Ally completely. Disconnect the device from any power sources or peripherals.
2. Remove the Back Cover:
- Locate the six screws securing the back cover. They are located around the edges of the device. Note that the center bottom screw will remain in place.
- Use your Phillips head screwdriver to remove the 5 screws carefully, leaving the 6th center bottom screw. Be mindful to keep track of each screw that you remove.
- Gently pry open the back cover using the plastic pry tool, starting from a corner. Work your way around the edges to detach it completely.
3. Disconnect the battery:
- Use a spudger or a flat-head screwdriver to gently push the locking bar away from the battery connector to unlatch it.- Insert the flat end of the spudger under the center of the battery connector. Lift the connector straight up and out of its socket. Be gentle when disconnecting the battery. Forcing the connector can damage the socket or the locking bar. If you are also encountering battery issues, don’t hesitate to browse the ROG Ally battery section of our site.
4. Locate the Speakers:
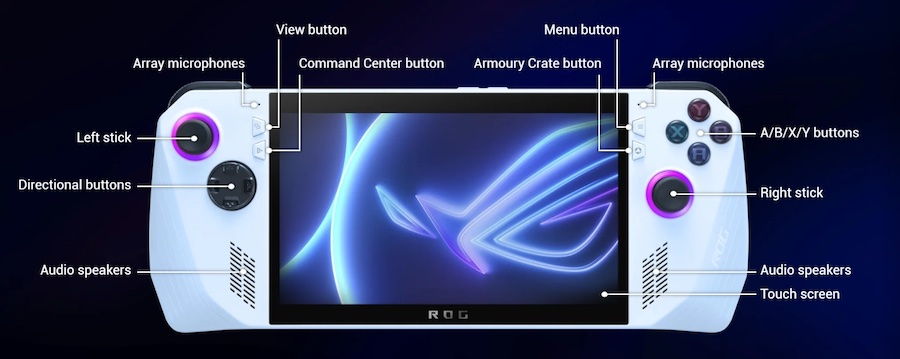
- The speakers are located near the bottom of the device, facing outwards. They might be secured with additional screws or clips.
- Carefully remove any screws or clips holding the speakers in place.
5. Disconnect the Old Speakers:
- Locate the cables connecting the old speakers to the motherboard.
- Gently disconnect the cables, taking note of their orientation for correct reconnection.
6. Install the New Speakers:
- Connect the cables from the new speakers to the motherboard, ensuring they match the orientation of the old cables.
- Secure the new speakers in their designated positions using any screws or clips that were removed.

7. Reattach the Back Cover:
-Align the back cover with the device and carefully reattach it.
-Secure the cover with the screws you removed earlier.
8. Power On and Test:
- Connect your Ally to a power source and turn it on.
- Play some audio content to test the new speakers. If the sound quality is restored and there are no issues, your speaker replacement is successful.
9. Troubleshooting Tips
- No Sound: If you're not hearing any sound after the replacement, double-check the cable connections and ensure the speakers are properly seated.
- Static Noise: Static noise can be caused by loose connections or interference. Inspect the cables and ensure they are securely connected.
By following these steps and troubleshooting tips, you can successfully replace your ROG Ally speakers and restore your device's audio. Remember to exercise caution and refer to the official Asus documentation for specific instructions related to your device model. Check out our site for the full list of original Ally parts as well as OEM components for all Asus devices! Once your Ally is up and running, learn how to optimize it for games like Elden Ring and its new expansion, Shadow of the Erdtree.